Multi Purpose Media Boxes - Responsive Grid v1.0
Thank you for purchasing my item. If you have any questions that are beyond the scope of this help file, please feel free to email via my user page contact form here. Thanks so much!
Table of Contents
The Files You Need
First when you unzip the plugin you will see this folders:
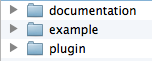
- documentation: Where you will find this documentation you are reading.
- example: Where you will find the page of the live preview showing some examples of the plugin.
- plugin: You will find just the files needed for the plugin to work.
So I will focus in the plugin folder so you can learn how to implement the plugin from scratch.
When you open the plugin folder you are going to find this files:
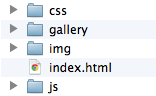
- css: You will find the stylesheet of the plugin (CSS files).
- gallery: This is the folder containing all the images that were added manually to the grid (of course you don't need this folder, you can add your images URL from anywhere).
- img: Here you will find the images needed for the gallery like the icons and loading bar.
- index.html: HTML page where you will find just the code for the gallery.
- js: In this folder you will find the scripts needed for the gallery including jQuery.
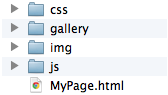
So if you have lets say a HTML page named MyPage.html you need to add this files except the index.html and the directory will look like this:
The Basic Code You Need
First you need to add the mediaBoxes.css file to the head of your HTML page where I assume you have another stylesheets for your site. You will add it like this:

Second you need to add the scripts files at the bottom of your HTML page (following best practices) where I assume you have another JS files for your site. You will add it like this:

Third You must create a container (div) that will contain all the boxes for the grid.
You can use any id for the gallery and you will use it to initialize the plugin through Javascript. And it will look like this:
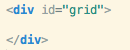
Inside this div with a class of "grid" you will add boxes that will contain images, videos or HTML. You will learn how to do this in the next section.
Fourth you need to initialize the gallery through Javascript using the id you specified before and you will do it like this:
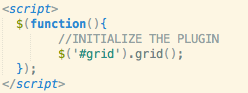
And you can copy&paste the code from here:
<!-- STYLE FOR THE PLUGIN -->
<link rel="stylesheet" href="css/mediaBoxes.css" />

<div id="grid">

</div>

<!-- SCRIPTS FOR THE PLUGIN -->
<script src="js/jquery-1.9.1.min.js"></script>
<script src="js/rotate-patch.js"></script>
<script src="js/waypoints.min.js"></script>
<script src="js/mediaBoxes.min.js"></script>

<script>

    $(function(){
        //INITIALIZE THE PLUGIN
        $('#grid').grid();
    });

</script>
Making Boxes!
Now you can add boxes (divs) inside the container div ( <div id="grid"> ), in each box you will specify:
- The category of the box so it can be filtered by the navigation filter bar (this is totally optional you don't need to specify a category)
And then inside you will put any HTML code you need. This is an example of 3 boxes with categories, the first 2 boxes belong to the "Category 1" and the last one to the "Category 2":
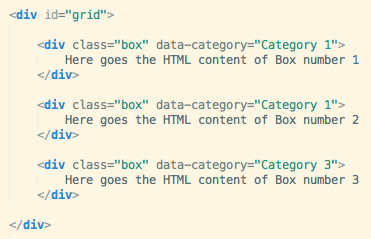
Then you can create as many boxes as you want for the grid as you can see in the example page.
And you can copy&paste all the code together from here:
<!-- STYLE FOR THE PLUGIN -->
<link rel="stylesheet" href="css/mediaBoxes.css" />

<div id="grid">

        <div class="box" data-category="Category 1">
            Here goes the HTML content of Box number 1
        </div>

        <div class="box" data-category="Category 1">
            Here goes the HTML content of Box number 2
        </div>

        <div class="box" data-category="Category 3">
            Here goes the HTML content of Box number 3
        </div>

</div>

<!-- SCRIPTS FOR THE PLUGIN -->
<script src="js/jquery-1.9.1.min.js"></script>
<script src="js/rotate-patch.js"></script>
<script src="js/mediaBoxes.min.js"></script>

<script>

    $(function(){
        //INITIALIZE THE PLUGIN
        $('#grid').grid();
    });

</script>
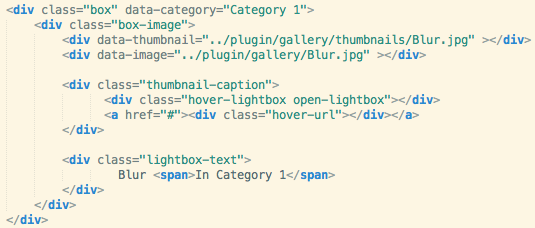
Adding Images To The Boxes
Now is time to add some images to the boxes in a cool way, first you need to specify the thumbnail (little image) that will be shown in the grid and also the large image that will be shown in the lightbox when is open. The HTML markup for this is just this one:

Now you add the overlay (thumbnail caption) when you put the mouse over an image with the icon to open the lightbox and the icon to open an external URL, it will look like this:
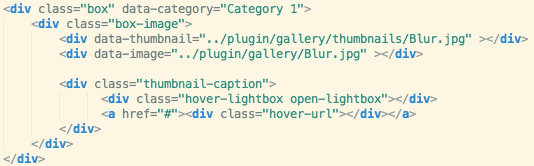
The div with a class of "thumbnail-caption" is the pink layout over the image and the two divs insde are the icons inside, one will open the lightbox with the large image and the other one you can specify an url in the "a" tag so it links anywhere.
Here you can also specify the text that will be shown in the lightbox just by adding another div with a class of "lightbox-text" like this:
And you can copy&paste all the code together from here:
<!-- STYLE FOR THE PLUGIN -->
<link rel="stylesheet" href="css/mediaBoxes.css" />

<div id="grid">

        <div class="box" data-category="Category 1">
            <div class="box-image">
                <div data-thumbnail="../plugin/gallery/thumbnails/Blur.jpg" ></div>
                <div data-image="../plugin/gallery/Blur.jpg" ></div>

                <div class="thumbnail-caption">
                      <div class="hover-lightbox open-lightbox"></div>
                      <a href="#"><div class="hover-url"></div></a>
                </div>

                <div class="lightbox-text">
                        Blur <span>In Category 1</span>
                </div>
            </div>
        </div>

        <div class="box" data-category="Category 1">
            Here goes the HTML content of Box number 2
        </div>

        <div class="box" data-category="Category 3">
            Here goes the HTML content of Box number 3
        </div>

</div>

<!-- SCRIPTS FOR THE PLUGIN -->
<script src="js/jquery-1.9.1.min.js"></script>
<script src="js/rotate-patch.js"></script>
<script src="js/mediaBoxes.min.js"></script>

<script>

    $(function(){
        //INITIALIZE THE PLUGIN
        $('#grid').grid();
    });

</script>
Lets Add Some Captions Below The Images
You can add your own HTML markup for the caption with your own CSS style after the image (<div class="box-image">), but I provided one caption that may help you and that you can easly tweak through CSS, and here is the HTML markup added after the div with a class of box-image.
You can specify some title, some text and at the bottom the popular social icons in which you can add some HTML to link to a FB page or add another functionality that you may want.
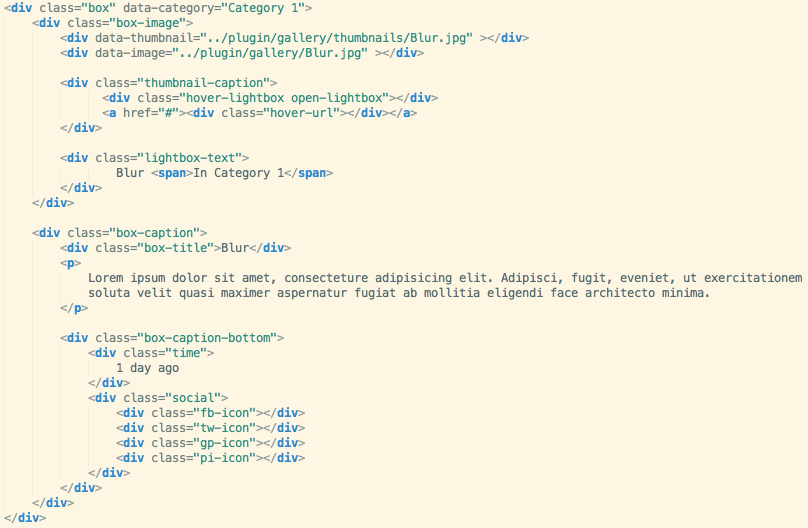
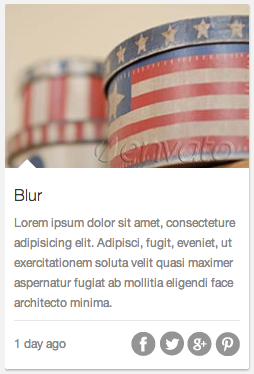
The HTML code aboves is for a single box with an image and a caption below and this is how it will look like:
And you can copy&paste all the code together from here:
<!-- STYLE FOR THE PLUGIN -->
<link rel="stylesheet" href="css/mediaBoxes.css" />

<div id="grid">

        <div class="box" data-category="Category 1">
             <div class="box-image">
                 <div data-thumbnail="../plugin/gallery/thumbnails/Blur.jpg" > </div>
                 <div data-image="../plugin/gallery/Blur.jpg" > </div>

                 <div class="thumbnail-caption">
                       <div class="hover-lightbox open-lightbox"> </div>
                       <a href="#"> <div class="hover-url"> </div> </a>
                 </div>

                 <div class="lightbox-text">
                        Blur  <span>In Category 1 </span>
                 </div>
             </div>

             <div class="box-caption">
                 <div class="box-title">Blur </div>
                 <p>
                    Lorem ipsum dolor sit amet, consecteture adipisicing elit. Adipisci, fugit, eveniet, ut exercitationem soluta velit quasi maximer aspernatur fugiat ab mollitia eligendi face architecto minima.
                 </p>

                 <div class="box-caption-bottom">
                     <div class="time">
                        1 day ago
                     </div>
                     <div class="social">
                         <div class="fb-icon"> </div>
                         <div class="tw-icon"> </div>
                         <div class="gp-icon"> </div>
                         <div class="pi-icon"> </div>
                     </div>
                 </div>
             </div>
        </div>

        <div class="box" data-category="Category 1">
            Here goes the HTML content of Box number 2
        </div>

        <div class="box" data-category="Category 3">
            Here goes the HTML content of Box number 3
        </div>

</div>

<!-- SCRIPTS FOR THE PLUGIN -->
<script src="js/jquery-1.9.1.min.js"></script>
<script src="js/rotate-patch.js"></script>
<script src="js/mediaBoxes.min.js"></script>

<script>

    $(function(){
        //INITIALIZE THE PLUGIN
        $('#grid').grid();
    });

</script>
Time To Add Videos
You have 2 options to add youtube/vimeo videos:
- 1. You can add videos like in the Demo (a thumbnail that when you click on it it will open the video in the lightbox).
- 2. You can have a thumbnail as in the last section with a pink overlay but instead of opening the large image when you click on the icon it will open the lightbox with a video.
For the videos you must specify the iframe for the video (you can google how to obtain the iframe for a video in youtube or vimeo)
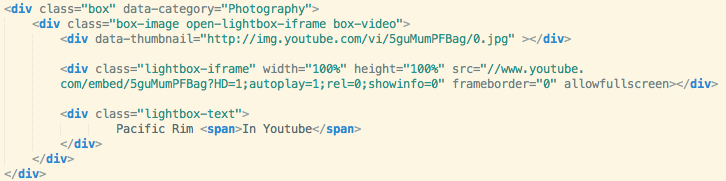
Option 1
First you must specify a thumbnail for the video just like you do when you add images, but you will have to add 2 extra CSS classes to the div with a class of "box-image". And these classes are:
- open-lightbox-iframe: so when you click on the thumbnail it will open the lightbox
- box-video: it will add the white arrow in the center to make it look like a video
And it will look like this:

In this example I'm using the thumbnail that youtube provides from a video, you can learn more about this here: http://www.reelseo.com/youtube-thumbnail-image/ and for vimeo here: https://coderwall.com/p/fdrdmg
Now you must specify the iframe of the video and you will specify it in a div with a class of "lightbox-iframe" instead of using the iframe tag, it will be like this:

Now if you are wondering how to get the iframe URL of a youtube video, for example, you can get it like this:
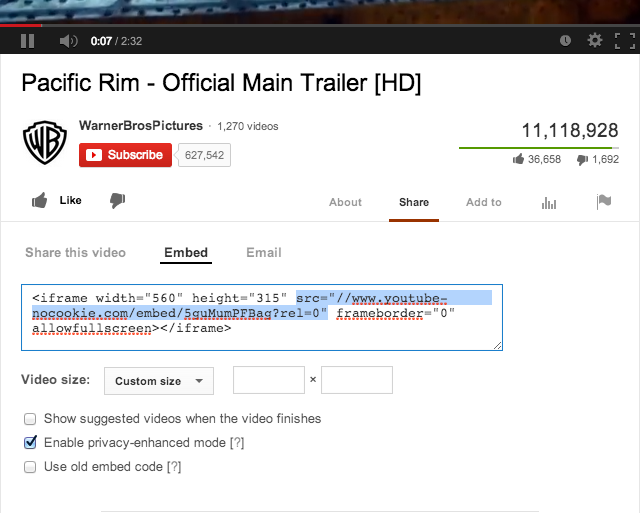
Just copy and paste the "src" attribute of the iframe tag that is on the Embed box that appears on every video in youtube and replace it for the one in the div with a class of lightbox-iframe. (In youtube you must click the "Share" tab and then select "Embed", you can google more about this if you are having doubts).
You can also specify the text for the lightbox as you did with images like this:
Now if you like you can a caption below the video just like we did on the images like this:
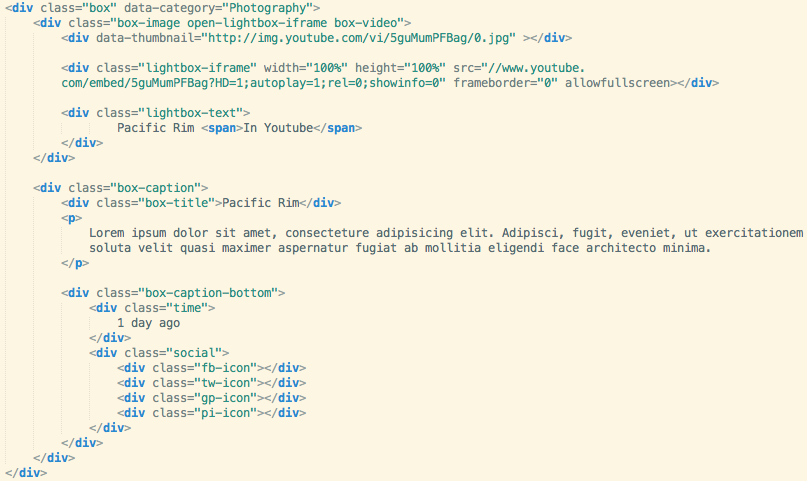
This will look like this:
And you can copy&paste all the code together from here:
<!-- STYLE FOR THE PLUGIN -->
<link rel="stylesheet" href="css/mediaBoxes.css" />

<div id="grid">

        <div class="box" data-category="Photography">
            <div class="box-image open-lightbox-iframe box-video">
                <div data-thumbnail="http://img.youtube.com/vi/5guMumPFBag/0.jpg" ></div>

                <div class="lightbox-iframe" width="100%" height="100%" src="//www.youtube.com/embed/5guMumPFBag?HD=1;autoplay=1;rel=0;showinfo=0" frameborder="0" allowfullscreen></div>

                <div class="lightbox-text">
                        Pacific Rim <span>In Youtube</span>
                </div>
            </div>

            <div class="box-caption">
                <div class="box-title">Pacific Rim</div>
                <p>
                    Lorem ipsum dolor sit amet, consecteture adipisicing elit. Adipisci, fugit, eveniet, ut exercitationem soluta velit quasi maximer aspernatur fugiat ab mollitia eligendi face architecto minima.
                </p>

                <div class="box-caption-bottom">
                    <div class="time">
                        1 day ago
                    </div>
                    <div class="social">
                        <div class="fb-icon"></div>
                        <div class="tw-icon"></div>
                        <div class="gp-icon"></div>
                        <div class="pi-icon"></div>
                    </div>
                </div>
            </div>
        </div>

        <div class="box" data-category="Category 1">
            Here goes the HTML content of Box number 2
        </div>

        <div class="box" data-category="Category 3">
            Here goes the HTML content of Box number 3
        </div>

</div>

<!-- SCRIPTS FOR THE PLUGIN -->
<script src="js/jquery-1.9.1.min.js"></script>
<script src="js/rotate-patch.js"></script>
<script src="js/mediaBoxes.min.js"></script>

<script>

    $(function(){
        //INITIALIZE THE PLUGIN
        $('#grid').grid();
    });

</script>
Option 2
This is the code for Option 2, it is very similar to the HTML markup of the images:
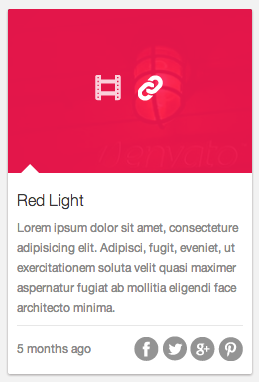
And it will look like this:
And you can copy&paste all the code together from here:
<!-- STYLE FOR THE PLUGIN -->
<link rel="stylesheet" href="css/mediaBoxes.css" />

<div id="grid">

        <div class="box" data-category="Photography">
            <div class="box-image">
                <div data-thumbnail="../plugin/gallery/thumbnails/Red Light.jpg" ></div>

                <div class="lightbox-iframe" width="100%" height="100%" src="//www.youtube.com/embed/5guMumPFBag??HD=1;autoplay=1;rel=0;showinfo=0" frameborder="0" allowfullscreen></div>

                <div class="thumbnail-caption">
                      <div class="hover-iframe open-lightbox-iframe"></div>
                      <a href="#"><div class="hover-url"></div></a>
                </div>

                <div class="lightbox-text">
                        Red Light <span>In Photography</span>
                </div>
            </div>

            <div class="box-caption">
                <div class="box-title">Red Light</div>
                <p>
                    Lorem ipsum dolor sit amet, consecteture adipisicing elit. Adipisci, fugit, eveniet, ut exercitationem soluta velit quasi maximer aspernatur fugiat ab mollitia eligendi face architecto minima.
                </p>

                <div class="box-caption-bottom">
                    <div class="time">
                        5 months ago
                    </div>
                    <div class="social">
                        <div class="fb-icon"></div>
                        <div class="tw-icon"></div>
                        <div class="gp-icon"></div>
                        <div class="pi-icon"></div>
                    </div>
                </div>
            </div>
        </div>

        <div class="box" data-category="Category 1">
            Here goes the HTML content of Box number 2
        </div>

        <div class="box" data-category="Category 3">
            Here goes the HTML content of Box number 3
        </div>

</div>

<!-- SCRIPTS FOR THE PLUGIN -->
<script src="js/jquery-1.9.1.min.js"></script>
<script src="js/rotate-patch.js"></script>
<script src="js/mediaBoxes.min.js"></script>

<script>

    $(function(){
        //INITIALIZE THE PLUGIN
        $('#grid').grid();
    });

</script>
Multi Purpose
You can choose what to add in the boxes, you can add just the caption box, or only images, or only videos, etc. you can play around with these.
Adding Performance
You don't need to add a thumbnail for each image, just for the ones you like. If you don't add a thumbnail it will take the normal image as thumbnail for the grid but is very recommended to use thumbnails so the grid is faster.
Options
Now is time to make some changes to the default settings of the plugin, and you can configure the options through Javascript as usual.
For example if you wish to change the number of images to load you will pass it to the grid function in javascript like this:
$('#grid').grid({ imagesToLoad: 5 })
If you want to change another option you need to put a coma and add another option like this: $('#grid').grid({ imagesToLoad: 5, imagesToLoadStart: 15 })
Options Available
These are the all the options available that you can pass to the grid function:
{
    showFilterBar: true,
    imagesToLoad: 5,
    imagesToLoadStart: 15,
    lazyLoad: true,
    isFitWidth: true,
    horizontalSpaceBetweenThumbnails: 15,
    verticalSpaceBetweenThumbnails: 15,
    columnWidth: 'auto',
    columns: 5,
    columnMinWidth: 220,
    isAnimated: true,
    caption: true,
    captionType: 'grid',
    hoverImageIconsAnimation: true,
    hoverImageIconsSpeedAnimation: 100,
    lightBox: true,
    lightboxKeyboardNav: true,
    lightBoxSpeedFx: 500,
    lightBoxZoomAnim: true,
    lightBoxText: true,
    lightboxPlayBtn: true,
    lightBoxAutoPlay: false,
    lightBoxPlayInterval: 4000,
    lightBoxShowTimer: true,
    lightBoxStopPlayOnClose: false,
    allWord: "All",
    loadMoreWord: "LOAD MORE ENTRIES",
}
And now a little description of each one:
| Option | Description |
|---|---|
| showFilterBar | Would you like to show the navigation bar of categories true, false |
| imagesToLoad | The number of images to load when you click the load more button or in lazzy load a number |
| imagesToLoadStart | The number of images to load when it first loads the grid a number |
| lazyLoad | When you reach the end the grid will try to load more images as if you click the "load more images" button (be careful with this option specially when you have multiple galleries, I would recommend it only when you are using a single gallery and if you don't have content below) true, false |
| isFitWidth | This option need to be true if you wish the grid to be centered to its container (works when you set a static width in each column) true, false |
| horizontalSpaceBetweenThumbnails | The space between images horizontally a number |
| verticalSpaceBetweenThumbnails | The space between images vertically a number |
| columnWidth | The width of each columns, if you set it to 'auto' it will use the columns option instead 'auto', a number |
| columns | This will only work if you set the columnWidth to 'auto' and it is the number of columns you wish to display in the grid so it can adapt to its container a number |
| columnMinWidth | The minimum width of each columns when you set columnWidth to 'auto' a number |
| isAnimated | If you wish to display the animation when resizing or filtering with the nav bar true, false |
| caption | Would you like to show the caption in mouse over? true, false |
| captionType | The type of caption effect 'grid', 'grid-fade', 'classic' |
| hoverImageIconsAnimation | The animation of the Icons of the image true, false |
| hoverImageIconsSpeedAnimation | The speed of the animation of the Icons of the image a number |
| lightBox | Do you want the lightbox? true, false |
| lightboxKeyboardNav | Keyboard navigation of the next and prev image true, false |
| lightBoxSpeedFx | The speed of the lightbox effects a number |
| lightBoxZoomAnim | Do you want the zoom effect of the images in the lightbox? true, false |
| lightBoxText | If you wish to show the text in the lightbox true, false |
| lightboxPlayBtn | Show the play button? true, false |
| lightBoxAutoPlay | The first time you open the lightbox it start playing the images true, false |
| lightBoxPlayInterval | The interval in the auto play mode a number |
| lightBoxShowTimer | If you wish to show the timer in auto play mode true, false |
| lightBoxStopPlayOnClose | Stop the auto play mode when you close the lightbox? true, false |
| allWord | The "All" word so you can translate it to another lenguaje |
| LOAD MORE ENTRIES | The "Load More Entries" word so you can translate it to another lenguaje |
Some Logic
When you have categories, and if you select a category through the navigation bar, the plugin will look and find if there still more images from that category to load and if there is more images to load it will show the "load more images" button, then when you click on it it will load more images only from that category (according to the "imagesToLoad" option).
Still Confused
If you still having doubts or if you didn't understand something feel free to contact me via email through my profile Here at the bottom there is a contact form, I will help you any way I can!